How to fit and trim Black Diamond Ascension Nylon STS skins
If you've just bought Black Diamond Ascension Nylon STS climbing skins, it can be a little daunting to figure out how to get them fit and trimmed to your skis.
Fortunately, Gregg here at the Start Haus is a pro. We'll go through step by step with Gregg so you get your skins trimmed right the first time.
First things first, here's what should be included - organize it to get ready to go.

Next, place the tip loop on the tip of the ski to see if it's the right size.

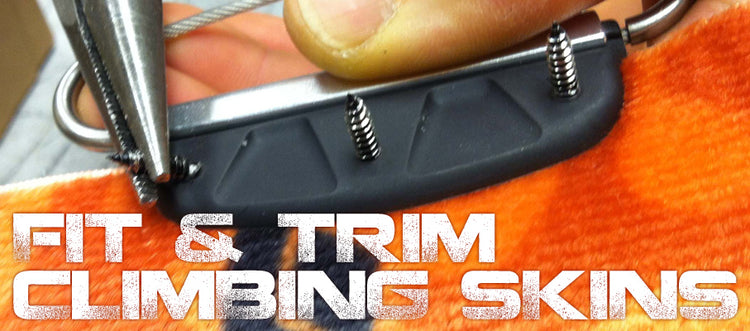
In this case, the loop is a little too large, so we slide the plastic part back, exposing the end of the wire. Move the end of the wire into a catch farther in to take up slack.

Next, pick a spot for the tail clip on the tail. We like to have it fairly close to the skin, so you don't end up with a lot of the plastic tail to move around while skinning.

Place the skin on the ski starting with the tail. You'll be cutting from the tip with these skins, so this is where you'll figure out the correct length.

Put the tip loop on, fold the skin over where the two meet, and mark that point on the skin. This is where you'll be cutting the skin for length.

Place the tip loop over the cut end of the skin, then screw the three included screws through the skin and tip loop.

Break the ends off the screws with a pair of pliers.

With the tip attached, put the skins back on the ski, starting from the tip, and attach the tail clip. There will generally be one side hanging over the edge of the ski more than the other side. Use the included cutting tool, following the metal edge of the ski.

Lift the skin up, moving the cut side over so as to expose the metal edge, plus about two edge-widths of base as pictured above, then cut the other side of the skin.

This will leave the metal edges of the ski perfectly exposed when the skin is centered, as pictured below.

Trim the corners at the tip, using the trimming from the first cut as a guide to make the second cut symmetrical.


You can also use the trimming from the first skin when cut to length as a guide to cut the second skin to the correct length, saving time on measuring things out again.

If you follow these steps, you'll get a pair of perfectly sized climbing skins for your backcountry skis, ready to take on the backcountry. If you have any other questions about backcountry equipment, technique or on anything else, don't hesitate to contact the experts at the Start Haus at Online@starthaus.com